
Some food, some drink.
Pita’s not a p.i.t.a. Arabic flatbread step-by-step.
Abstract: About two years ago, I got damn sick and tired of buying what passed for “fresh” flatbread at the supermarket. After a bit of inquiry and research, I discovered a dough recipe for Arabic flatbread that makes a wonderful, puffy and soft “Greek” pita, as well as a readily-stuffable variant for pocket sandwiches and toasted chips. This post documents the pita-making process from start to finish, and contrasts the two techniques that yield different but equally-tasty results.
Purpose: The (allegedly) slower pace of rural
life is meant to be a positive trade-off for the lack of convenience
of the big city. I live in rural Kansas, almost three hours from any
Middle-Eastern Grocer; so any flatbread I'm liable to get here is
going to be found at the supermarket; where they sure as hell don't
make pita on-premises, meaning that it's almost always pushing
the limits of its shelf life.
At the point that I'd had enough and
decided that I'd try baking my own flatbread, I was looking for a
good Greek pita recipe to compliment some grilled gyros. At this
time I wasn't doing much food blogging, but I was doing plenty of
food blog reading. A must-read for me even today is
Kalofagas.ca. As far as I'm concerned, Peter is the Greek food
ambassador to North America. After firing an email in his direction,
I got these words of wisdom in response-
“...take a look at some
Arabic/Lebanese pita bread recipes and take it from there.”
Well, crap there's the problem; I
didn't even know what to call the stuff. I started searching again,
this time for “Arabic flatbread” recipes that would
allow for plenty of puff to the dough, yet still remain soft and
able to be wrapped around a whole mess of fillings. The recipe I
found (surprisingly) turned out to be an enriched yeast dough (i.e.
containing dairy and sugar) that also hedged a bit of last-second
leavening from baking powder. I've made this recipe repeatedly
since, and aside from taking the whole operation from the oven to the gas grill, the only real tweaks are a few minor changes to
ingredients coupled with some variants in technique. This versatile and simple recipe
for flatbread has the potential to yield two very different pitas
based on method. Because I know some of you are visual like me (i.e.
can't do it until you see it) I took extra photos this time to
accompany the observations.
Recipe: Jump to the detailed recipe. (or, keep reading for the gist of it) -
- Place all ingredients in the order listed into the bowl of a stand mixer. Attach dough hook and set to stir. Knead 10 minutes. If dough isn't holding together as a single mass (i.e. too wet) add flour as needed in the last 2-3 minutes of kneading. Finished dough will still be slightly sticky.
- Cover, let rise in warm place until doubled in size, about 2 hours.
- Preheat a gas grill on high heat with a baking stone for 20 minutes. Continue with all burners on high for baking.
- Divide dough into 2 in diameter balls, about 2.25 ounces (by weight) each.
- For thicker, pocket-less pita (Sometimes known as Greek pita), roll the dough ball into a 5 inch round using plenty of flour, let rest for a couple of minutes and finish rolling to a 7 - 8 inch round. Transfer the round to the hot stone with a pizza peel, top-side down. Bake for 2 minutes, leaving the grill open. Flip, close the grill and finish the second side 2 minutes more. Move to a wire rack to cool.
- For a pocket-style pita (suitable for chip-making and stuffing), roll the dough ball into a 5 inch round using plenty of flour, let rest for a couple of minutes and finish rolling to a 7 - 8 inch round. Let the round rest for 3 minutes more (the top will start to dry out) and transfer the round top-side down to the hot stone. Keeping the grill closed, bake for 90 seconds on each side. The bread should puff up like a balloon. Move to a wire rack to cool where the bread will collapse to form a lovely pocket.
Store in sealed ziptop bags after cooling.
Observation:
- Dough is easy if you're
organized: Measure the flour by weight
- No
need to worry about gradual addition of ingredients,
- After
10 minutes the dough should hold itself together in an only
slightly-sticky mass
- Time
to take it outside! You'll need a timer (super-important!) plenty
of staging space, a means to measure your dough potions(by weight or size), and a way
to retrieve and hold the bread coming off the stone.
- As
you tear portions of dough off to work each flattie, pull the mess
over itself, trapping what doesn't look so nice behind pinched
finger and thumb
- With
plenty of flour on the working surface, flatten the ball with the
heel of your hand moving out from the middle
- After
about 3 minutes' rest, the dough will have relaxed enough to roll
even flatter. Roll to a diameter of 7ish inches
- Before
baking anything,
fill up an assembly line, as you'll be working against the clock
- I
cook with my baking stone in an old pizza pan. I'm not sure if it actually
mitigates thermal stress on the stone or not, but the pan hasn't
really done anything since we got it eight years ago. If you want
a pocket, you're looking for a stone temperature between 500F-550F.
On my gas grill, that's all burners on high and the lid closed all
the time
- The
sans-pocket variety of flatbread needs less heat to tame the duo of
leaveners in the dough. 450F
Results: Although you could probably swing this
in the oven, I prefer my grill for two reasons: Firstly, these cook
so quick that the constant opening and closing of an oven can be a
bit clumsy; plus a fancy-schmancy oven's thermostat
constantly trying to self-regulate can confound a situation where
constant predictable heat is required. Second, the flour is a-flying
and a mess will be made. But, if you like to vacuum and dust, far be
it from me to tell you what to do...
I realize that this post is detailed;
however, the intention is not to scare you out of making flatbread
at home. On the contrary; after making these for the umpteenth time,
I hope to have accounted for most of the variation in cooking, which
should make for a straightforward and predictable experience. The
single servings mean that even if you somehow manage to screw it up,
you immediately get to try it again. The repetition is also a
great way to build confidence in working with dough in general. It
also doesn't hurt that even if mistakes are made,
they're gonna taste great. This bread is hearty but is still
even-textured enough that my kids really dig it. The flavor is just
sweet enough so as to reinforce the nuttiness of the whole grain
flour. It's also spades in versatility: Whereas the always-stale,
store-bought flatbread varieties seem to be susceptible to blowouts
when making even a simple sandwich, this recipe stays soft when kept
in a zip-top bag and still retains enough flex (no matter which way
you bake it) to accept just about any fillings you wanna stuff or
wrap into it.
So yeah, I live in the sticks and decent
bakery-fresh flatbread may be non-existent, but my discovering this
recipe would never had happened had it not been for the
“inadequacies” of rural living.
Gallery:
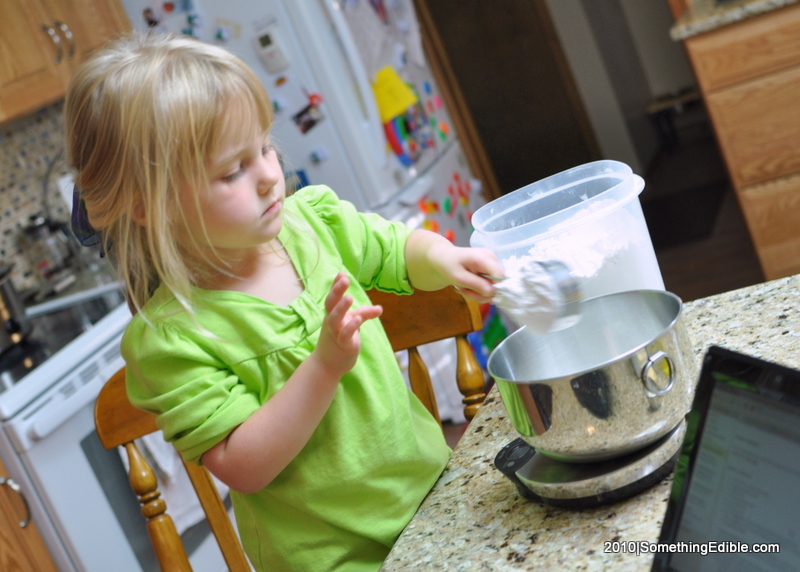
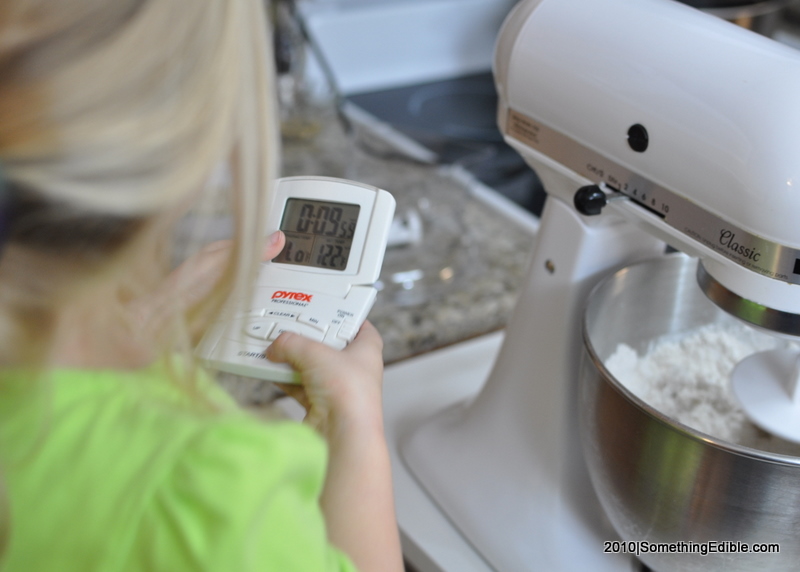
When baking, we always measure ingredients first. If my four-year-old can read a scale, so can you. ![]()
When baking, we always measure ingredients first. If my four-year-old can read a scale, so can you. ![]()

Everything is measured, staged, and ready to be combined. For me, it's much easier to look at a picture than read a list.
Everything is measured, staged, and ready to be combined. For me, it's much easier to look at a picture than read a list.
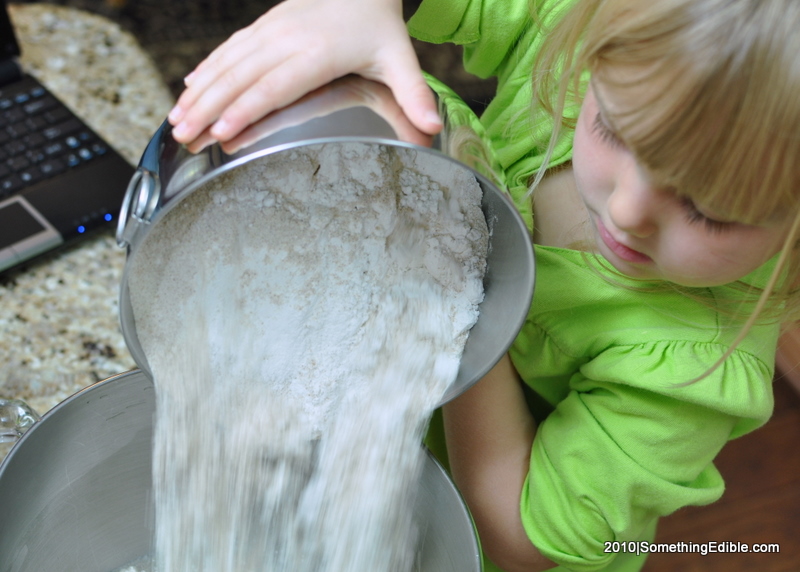
This is my daughter's favorite part of baking bread. For her dad, not so much; as I always have clean up that substantial amount that missed the bowl.
This is my daughter's favorite part of baking bread. For her dad, not so much; as I always have clean up that substantial amount that missed the bowl.

Just as soon as the dough starts to come together, set the timer for 10 minutes.
Just as soon as the dough starts to come together, set the timer for 10 minutes.
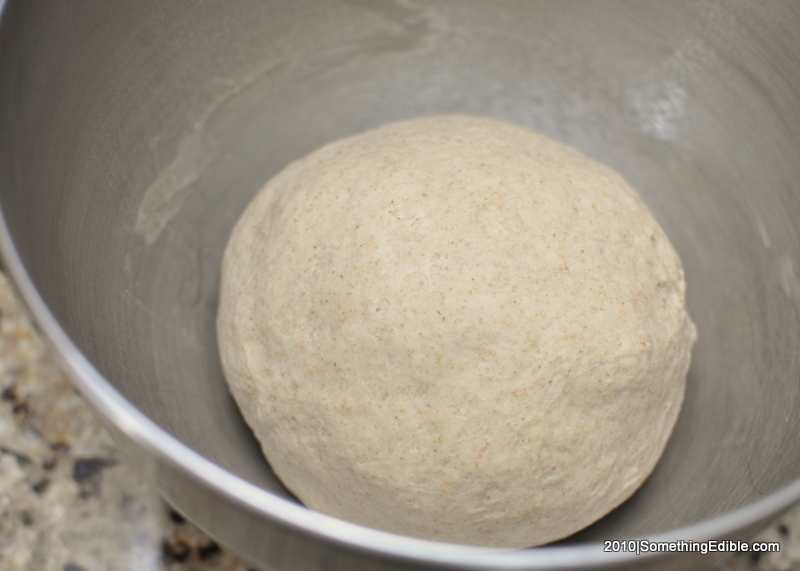
The kneaded dough should only be slightly sticky, and will have no problem holding its shape.
The kneaded dough should only be slightly sticky, and will have no problem holding its shape.
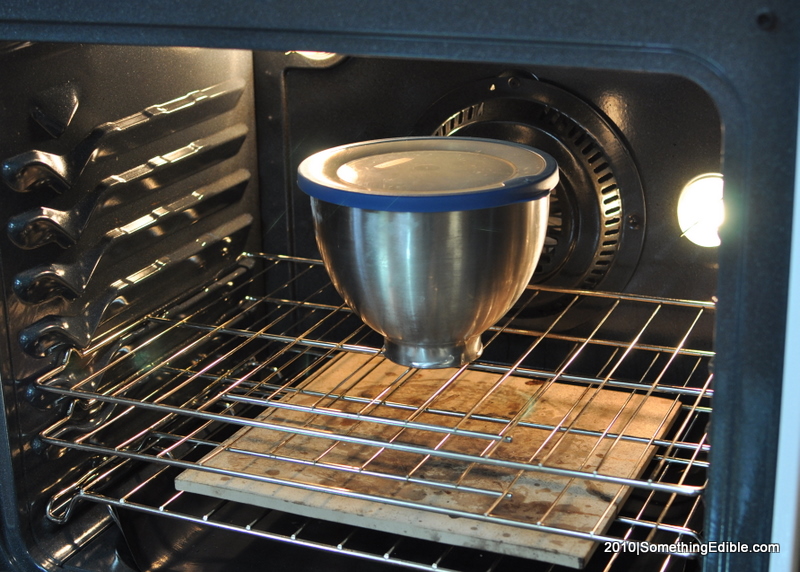
A closed oven with its light on is the best means to ensure your dough always rises predictably. Yay for controlled environments!
A closed oven with its light on is the best means to ensure your dough always rises predictably. Yay for controlled environments!

After two hours' time, this flatbread dough has easily doubled in volume. Irony!
After two hours' time, this flatbread dough has easily doubled in volume. Irony!

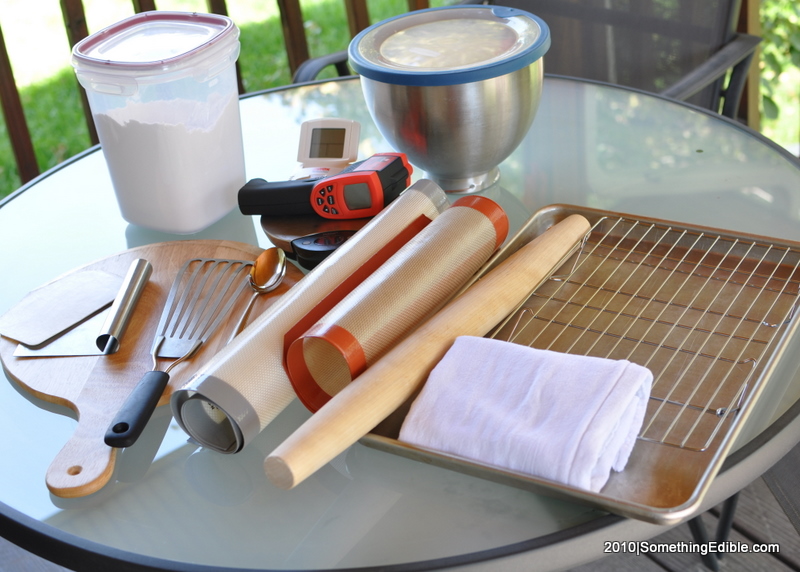
The tools of the pita baking assembly line. The IR…
The tools of the pita baking assembly line. The IR thermometer isn't required, but it's fun to have one!
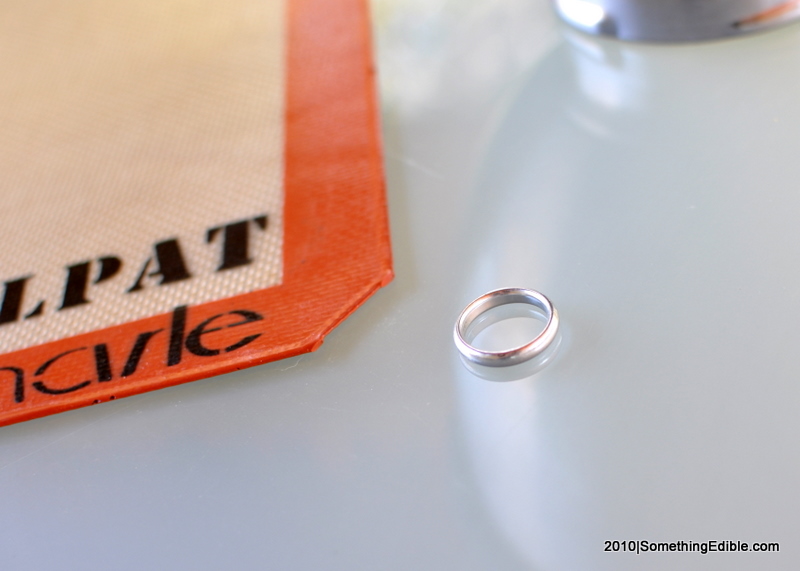
Shaping dough and handling raw meat are the only times my wedding band comes off (My wife already knows that cooking is my mistress).
Shaping dough and handling raw meat are the only times my wedding band comes off (My wife already knows that cooking is my mistress).
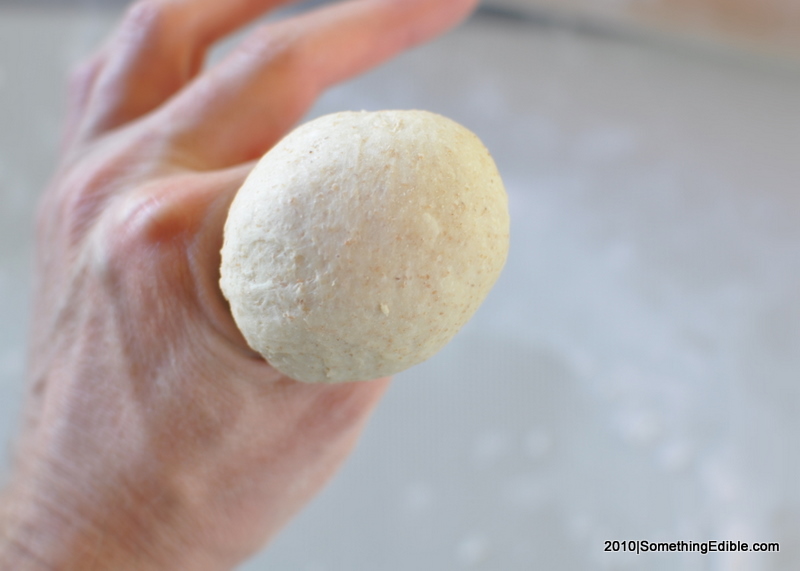
Shaping the dough into balls by pinching the extra toward the back makes portioning easy.
Shaping the dough into balls by pinching the extra toward the back makes portioning easy.

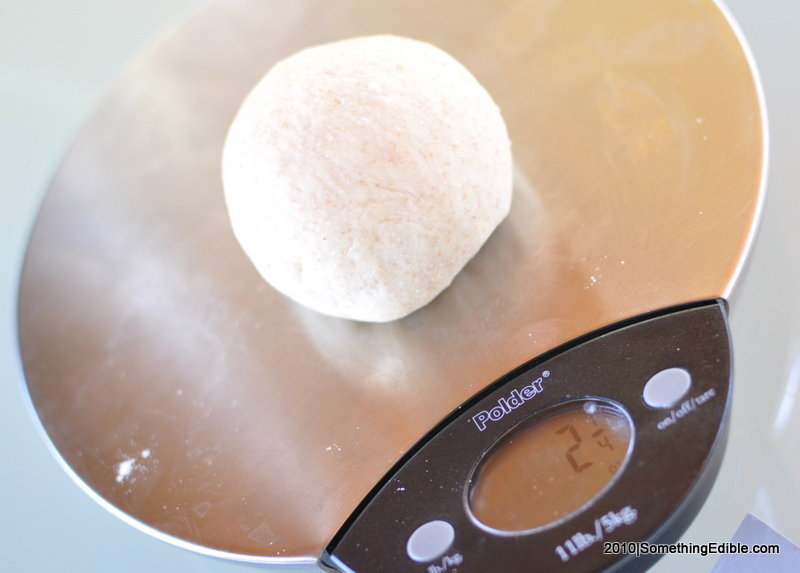
If you choose to measure your pita portions by weight, two and a quarter ounces is the target.
If you choose to measure your pita portions by weight, two and a quarter ounces is the target.

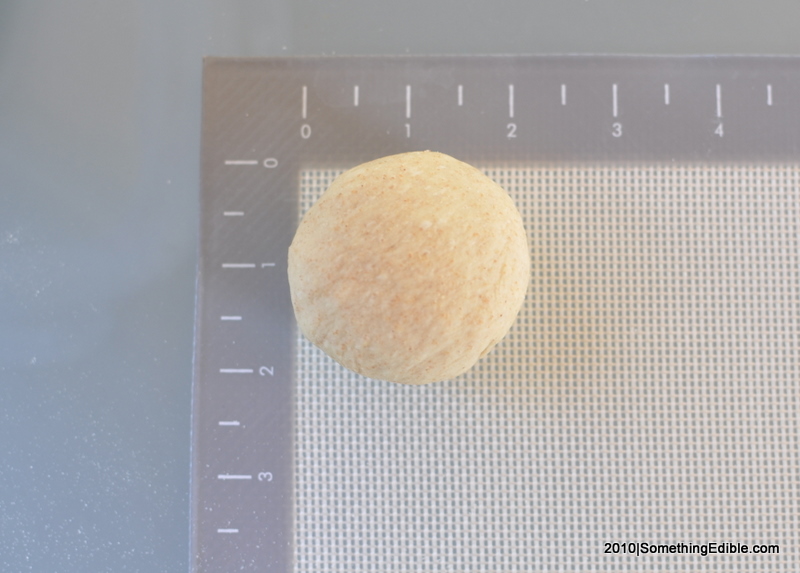
I can't think of any round thing that's about two inches in diameter for comparison. Just get out a ruler for crying out loud.
I can't think of any round thing that's about two inches in diameter for comparison. Just get out a ruler for crying out loud.

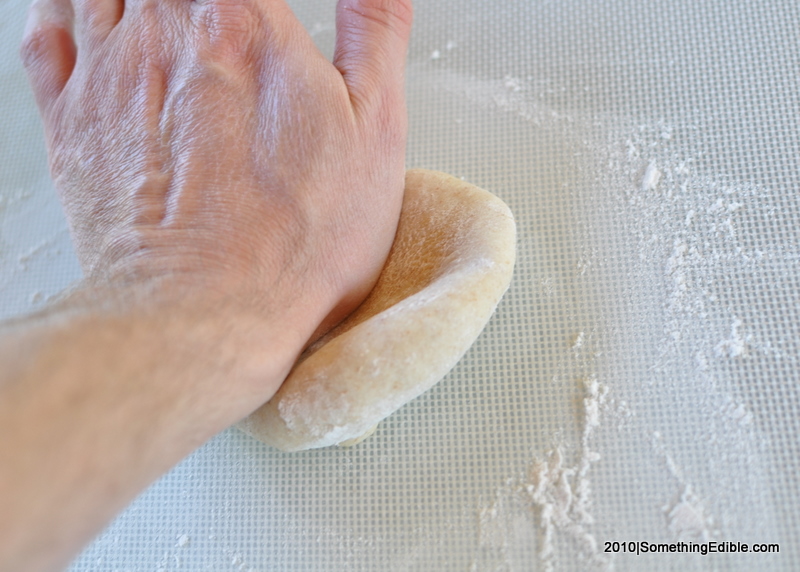
Flatten the ball with the heel of your hand before moving to the rolling pin. I think it keeps the final shape more round and uniform.
Flatten the ball with the heel of your hand before moving to the rolling pin. I think it keeps the final shape more round and uniform.

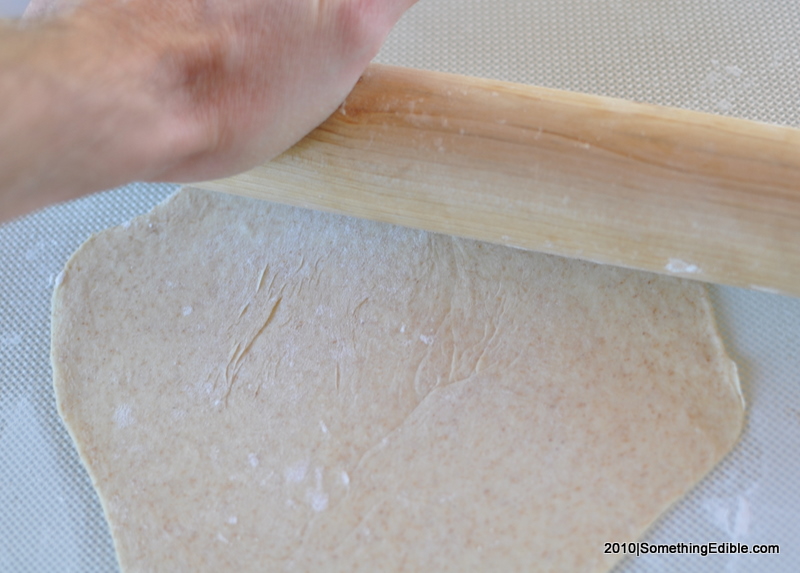
I know it sounds counter-intuitive, but rolling from just outside the center will get you to uniform thickness and shape faster and easier.
I know it sounds counter-intuitive, but rolling from just outside the center will get you to uniform thickness and shape faster and easier.

Peeled off the mat to rest, the dough round will contract a bit. While rolling, shoot for about six inches in diameter and the rested dough will shrink…
Peeled off the mat to rest, the dough round will contract a bit. While rolling, shoot for about six inches in diameter and the rested dough will shrink back to five.
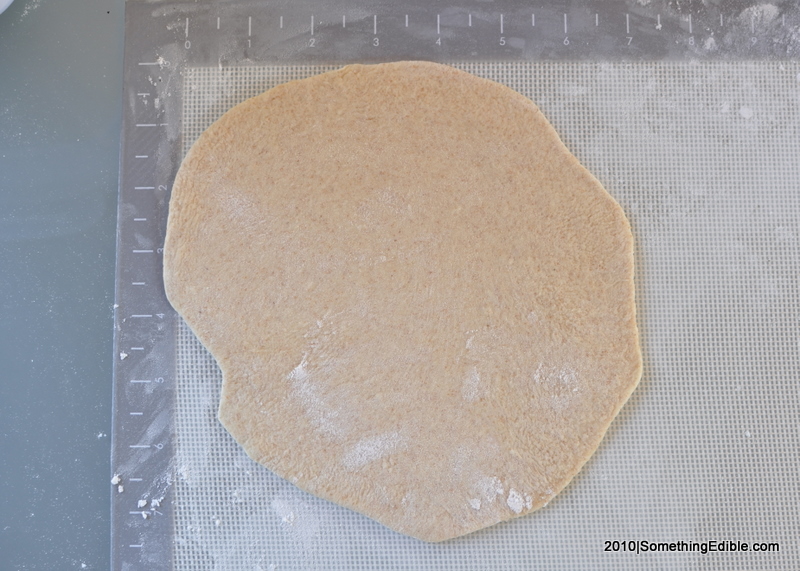
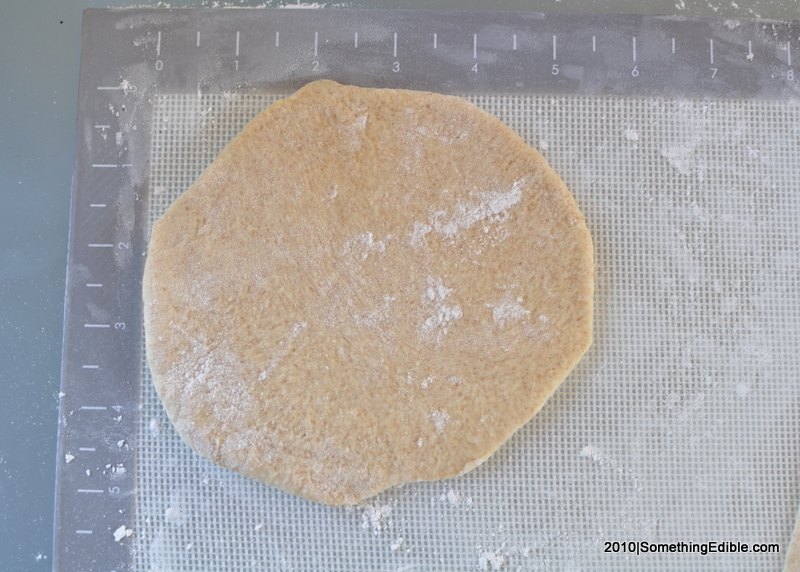
After the dough has rested and you've rolled it flat again, you should be able to eek out another two inches in diameter.
After the dough has rested and you've rolled it flat again, you should be able to eek out another two inches in diameter.
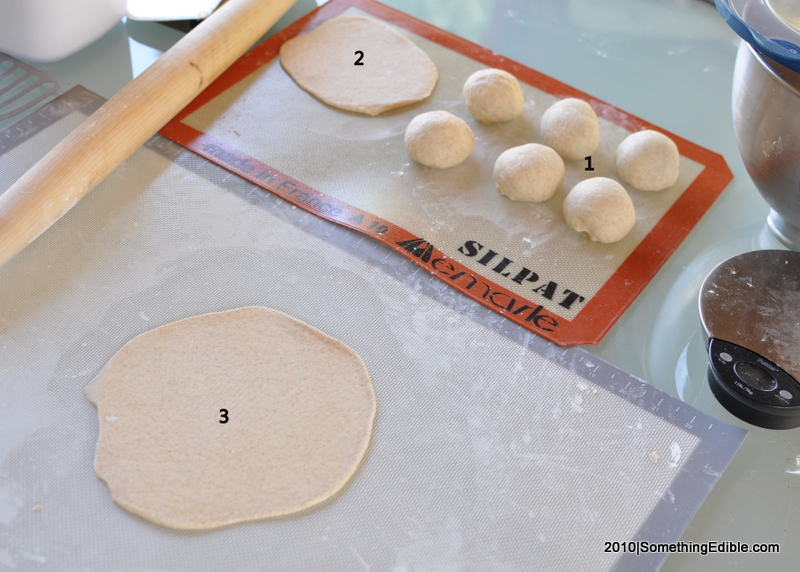
Here is my assembly line: 1) Portions formed. 2) Rolled round resting. 3) Rested round is rolled flat one more time before baking.
Here is my assembly line: 1) Portions formed. 2) Rolled round resting. 3) Rested round is rolled flat one more time before baking.
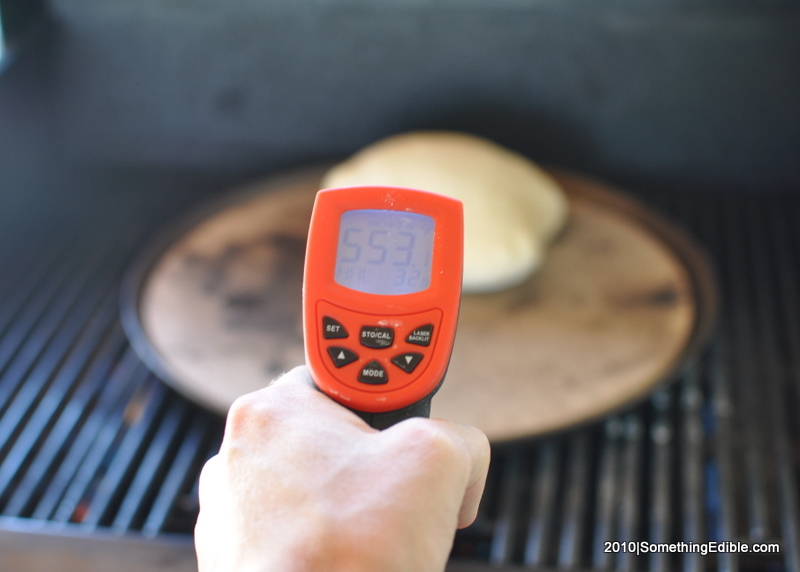
That stone is hot! As long as you're above 500F, the twice-rested round will puff like nobody's business
That stone is hot! As long as you're above 500F, the twice-rested round will puff like nobody's business

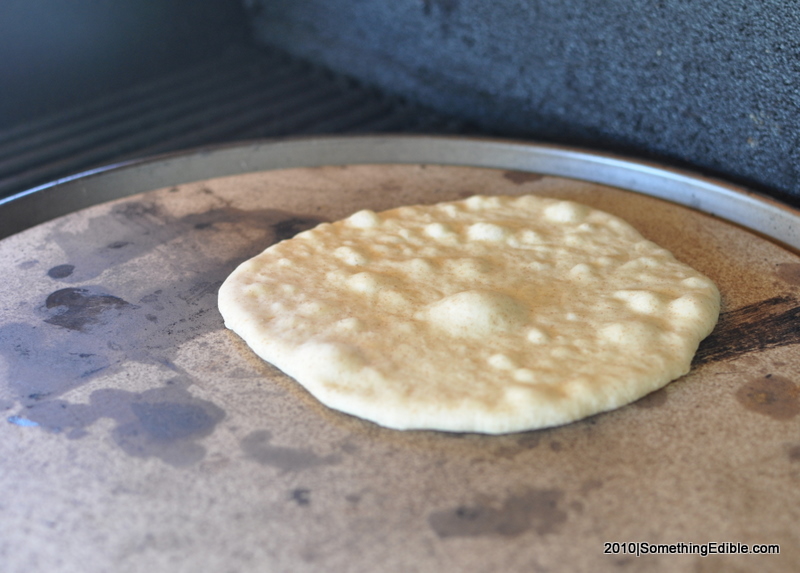
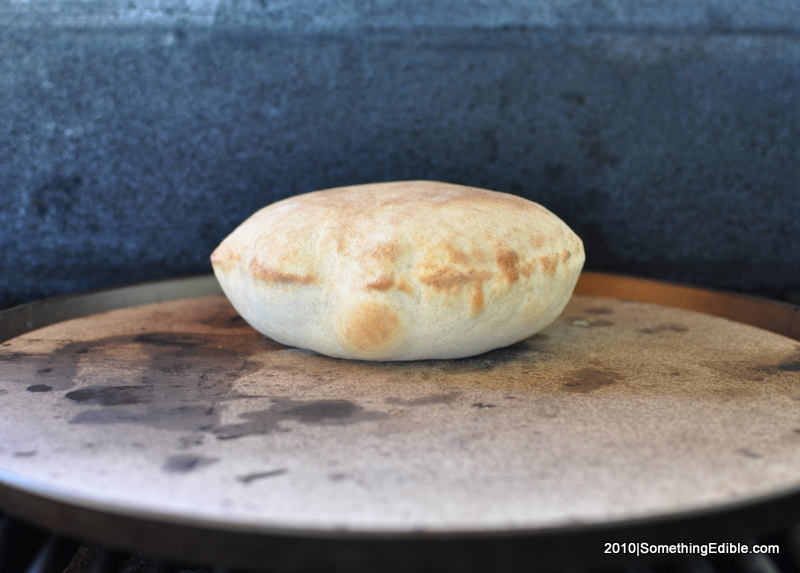
I just opened the grill lid and flipped this one. The first time you see the bread balloon, it's hard not to gawk.
I just opened the grill lid and flipped this one. The first time you see the bread balloon, it's hard not to gawk.
I gotta say it's kinda neat (and a bit unbelievable) to think one gets so much lift out of something that's initially so flat.
I gotta say it's kinda neat (and a bit unbelievable) to think one gets so much lift out of something that's initially so flat.
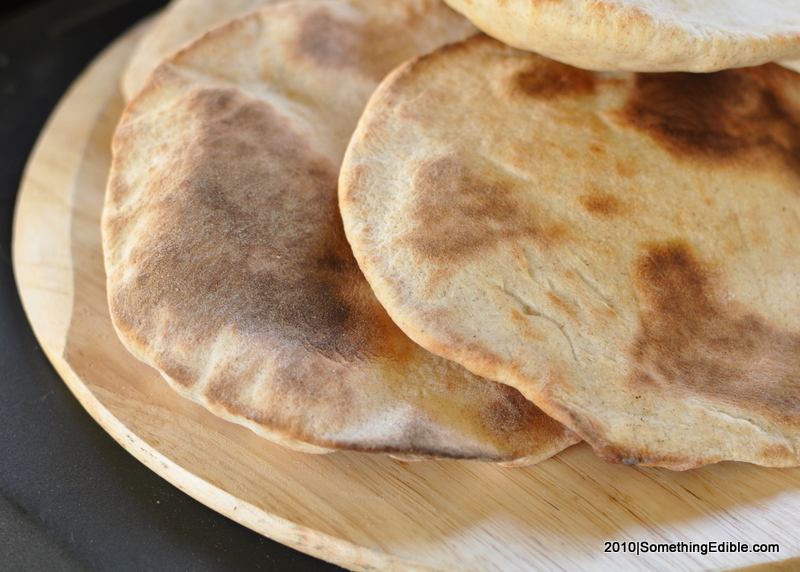
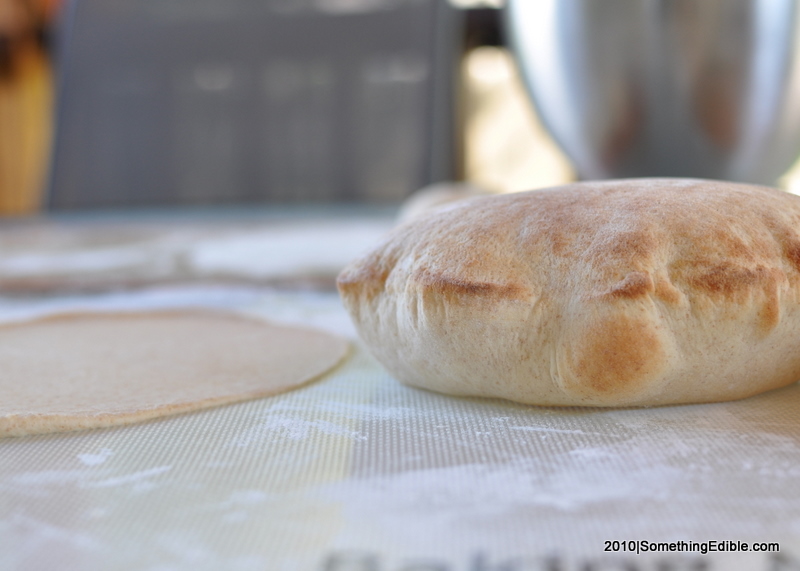
The pocket-style pitas are finished. Don't be fooled by the char; these aren't dry in the least. Put them in a zip-top bag just as soon as they deflate.
The pocket-style pitas are finished. Don't be fooled by the char; these aren't dry in the least. Put them in a zip-top bag just as soon as they deflate.
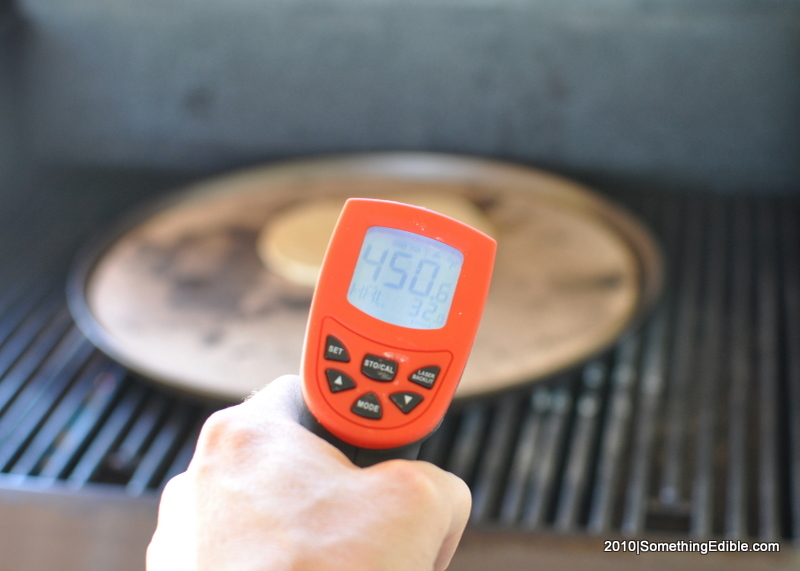
Time for pocketless pita. I've left the grill lid open for a bit to bring the stone temperature down to 450F.
Time for pocketless pita. I've left the grill lid open for a bit to bring the stone temperature down to 450F.
At the lower temperature, the production of gas doesn't happen as quickly. We're now creating multiple smaller pockets.
At the lower temperature, the production of gas doesn't happen as quickly. We're now creating multiple smaller pockets.
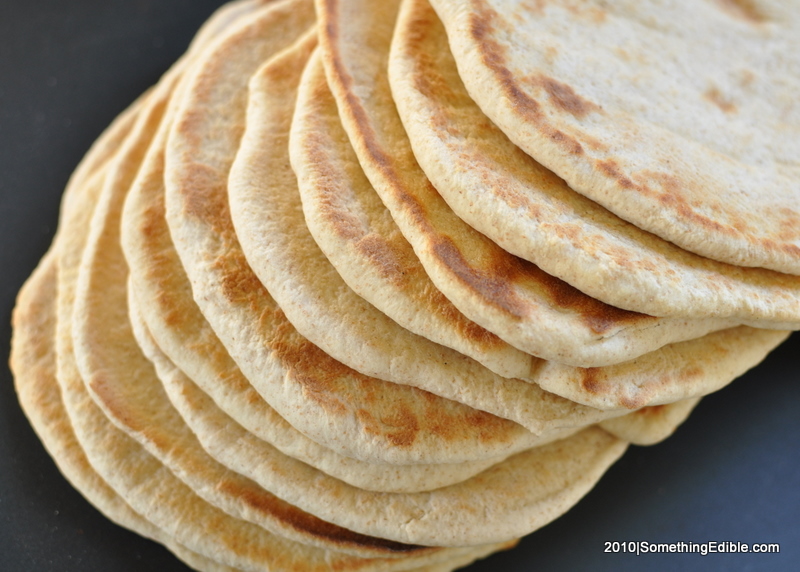
A big ol' stack of finished pocketless pita. I dare you not to eat one of these right off the stone with a drizzle of honey.
A big ol' stack of finished pocketless pita. I dare you not to eat one of these right off the stone with a drizzle of honey.

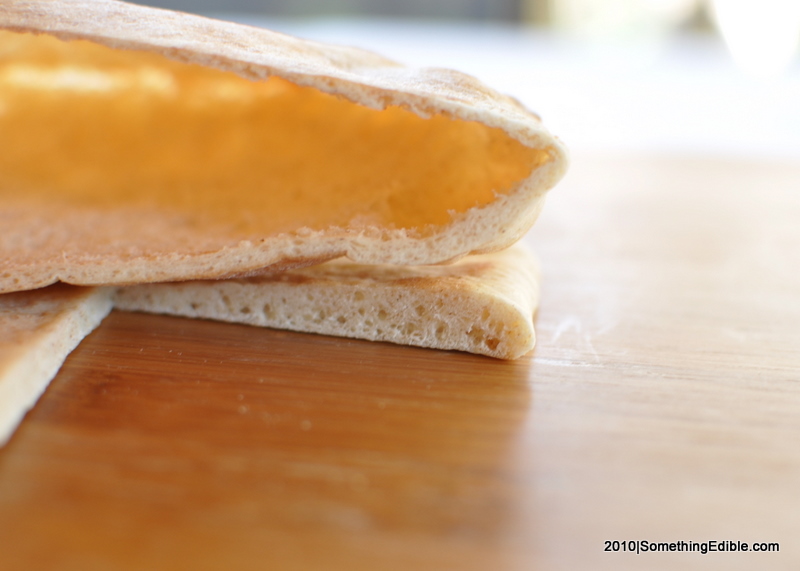
I had to take throw a cross-section in there so you could see the difference in texture from the two different baking methods.
I had to take throw a cross-section in there so you could see the difference in texture from the two different baking methods.
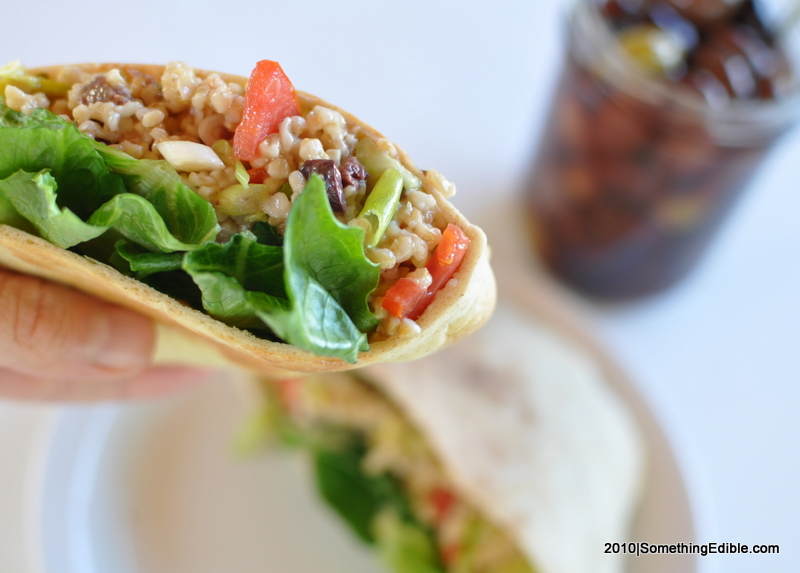
Pockets for lunch! I made a tabouli-style salad with pin oats standing in for bulgur wheat. You can seriously stuff these pita pockets without fear of…
Pockets for lunch! I made a tabouli-style salad with pin oats standing in for bulgur wheat. You can seriously stuff these pita pockets without fear of rupture.
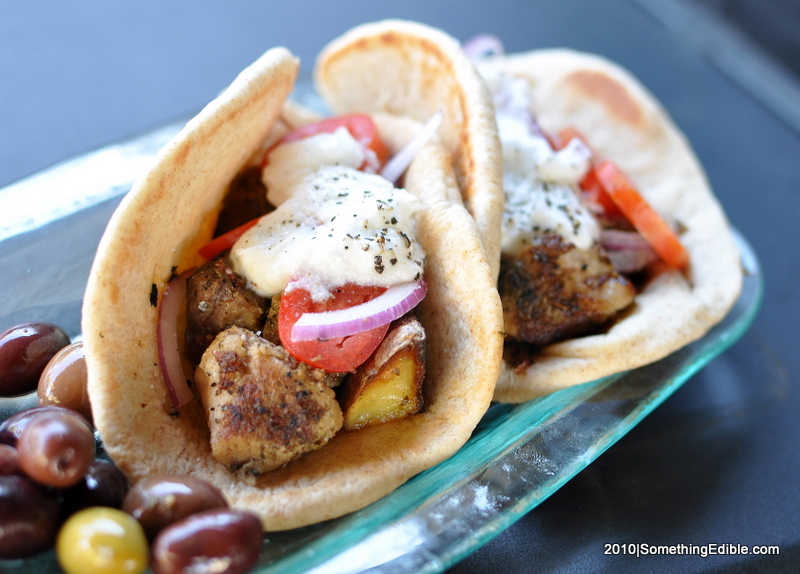
The pocketless option: Gyros for dinner! Marinated, slow-cooked pork, roasted potatoes and all the trimmings.
The pocketless option: Gyros for dinner! Marinated, slow-cooked pork, roasted potatoes and all the trimmings.
Get Social
Please wait while my tweets load...
Get the latest recipes and news. Join our Facebook page!


